To Bake or Buy: The Challah Question
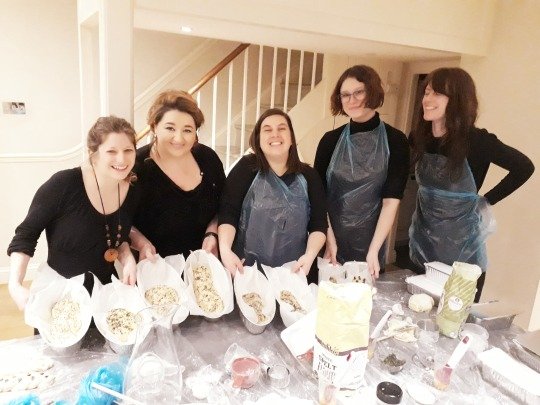
Everyone knows that a freshly baked challah loaf is one of the best tastes there is but alas it turns out that many of our staff lack basic baking skills (myself included!) and therefore are forced to have to buy our challah bread each week. To challenge ourselves the Learning Team organised for a few members of the museum staff to take part in a challah baking workshop held at Chabad Islington to see if even we could learn how to bake the perfect challah.
So off we went to Islington for a packed 2 hour workshop where we hoped to learn all the skills we would need to bake our own challah and of course plait it! So what did we learn? Here come our top tips!
Step 1: Find a great teacher
Hadasa from Chabad Islington was our teacher for the evening and along with her three lovely daughters, they guided us through the treacherous skill of live yeast. Something most of us hadn’t seen before let alone tried to use.
Step 2: Bake together
Like Shabbat, baking is best done with friends and family so pull together a group so you can share the experience. There were five of us from the museum and alongside meeting new people at the course we met a mother with her daughter who is preparing for her bat mitzvah and who coincidentally has a family heirloom on display in the museum!
Step 3: Get organised
You will need a few key pieces of equipment in your kitchen before you start. A mixing bowl, wooden spoon, parchment paper, an oven and oh that’s it! Really there is no excuse for not trying it!

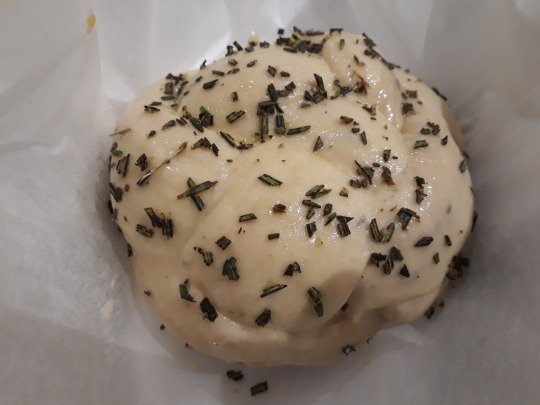
Alongside your equipment you need some basic ingredients. White bread or spelt flour, dry yeast (or live if you are feeling brave), eggs, sugar, vegetable oil, salt and warm water. You probably already have most of these in the cupboard. As we were already feeling adventurous we added some fillings to our challah bread including chopped rosemary and garlic or chocolate chips. All of us would recommend it. Top tip from us: If you haven’t used live yeast before then definitely get some advice or use dried. The fresh yeast made our challah taste even better but it needs someone who knows their bread!
Step 4: Get mixing
At its most basic form of a recipe, it really is super simple – proof the yeast and then all the wet ingredients and then all the dry. Even we can’t go wrong. Then leave it somewhere warm to rise for 2 hours.
Step 5: Get kneading
It starts out messy but when that sticky mess starts turning into dough you know things are going your way. Get stuck in with your hands and get that dough to a smooth consistency because what comes next is the fun part.
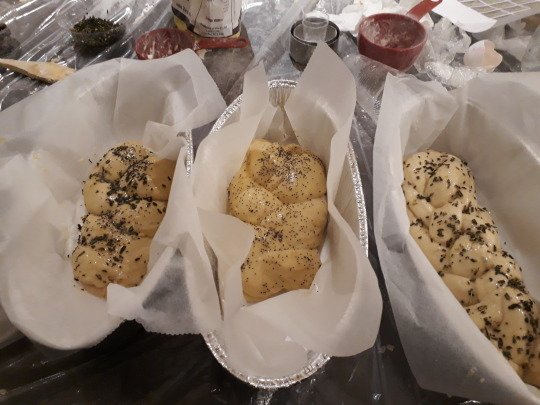
Step 6: Get plaiting
Ok, so now it’s time to decide how brave you really are. A three plait? A basket shape? A six or seven plait? It’s all possible with the right instructions. Between us we tried them all with various degrees of success. But in the end we were pretty pleased with how they all turned out. Once you are happy with your shape leave it rise for another 45 minutes.
Step 7: Get baking
So easy. Quick egg wash on the bread and any sprinkles of seeds if you want, then 200 C fan for 20 – 30 minutes depending on the size of your challah. Top tip we learned was to bake it straight on the wireframes in the oven so that the bottom of your bread bakes evenly too. When it starts looking golden brown you know you are close.
Step 8: Nosh and natter
Surely it’s almost Shabbat now? Your fresh bread is best served to your friends and family. Those who will judge you kindly!
So take up the challenge and get baking and if you feel like you could also use some expert guidance then perhaps go to Hadasa’s class! https://www.jewishislington.co.uk/events
And send us your challah photos @JewishMuseumLDN It’s only fair seeing as we shared ours!
The Learning Team